Field notes · Look · Try · Compare
Noticing shine in a photograph
Follow bright patches and narrow highlights across curved surfaces and folds.
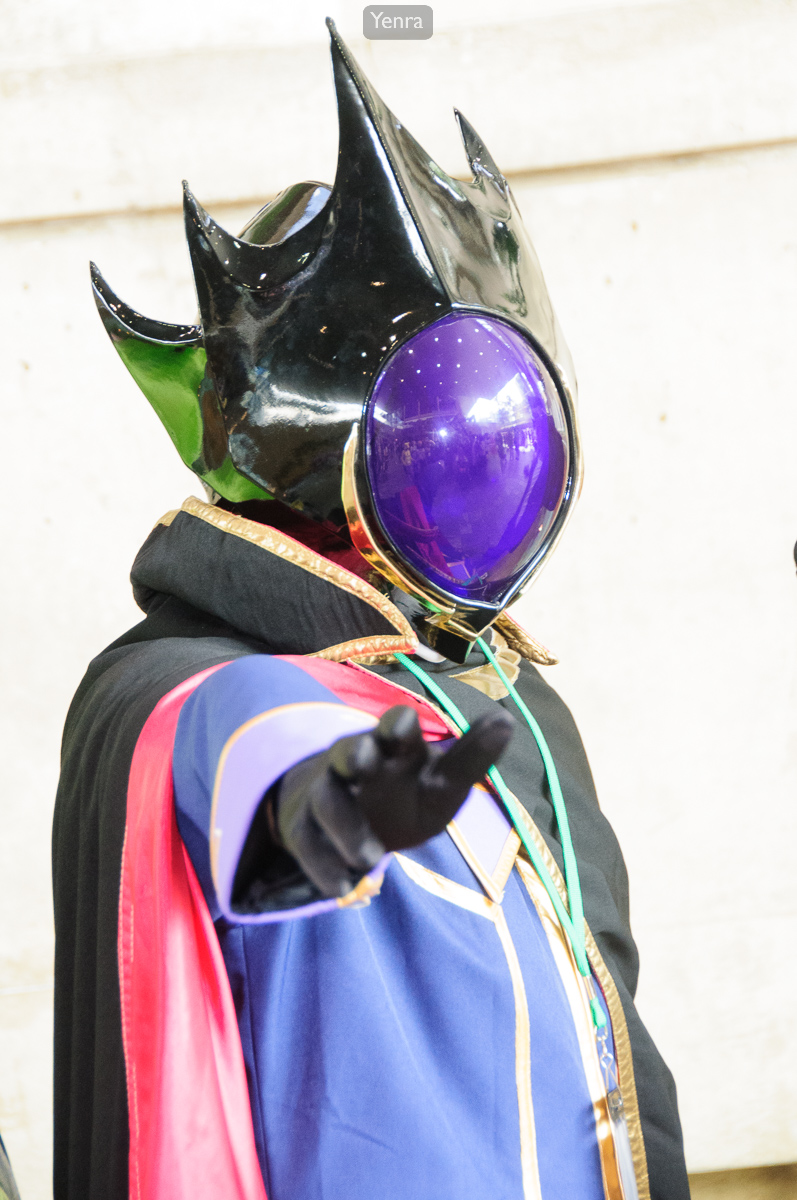
Portrait with a glossy black and purple helmet · Photograph: Yenra
Captured: 2011:07:30 10:11:07
Shine gives you another way to explore the shape of a surface. A broad bright patch can travel around a curve, while a narrow highlight can trace a fold. Look at the bright area and the surrounding tones together. Their relationship can help you notice a form that might otherwise pass quickly through your attention.
Follow bright patches across a curve
The glossy black and purple helmet carries several bright shapes across its curved surface. Reflected windows and ceiling lights appear within those areas. Follow the edge of one patch and notice how it bends beside the darker parts of the helmet. The purple faceplate offers another curved area to explore.
Being light in color and showing shine are different things to notice. A pale object may have an even tone; a darker object can carry a very bright reflection. Here, the contrast between the bright patches and darker surface makes the changing shape of the shine especially visible.
Choose a familiar glossy object for your own experiment, such as a mug or ornament. Find a bright patch on it before making a photograph. Include enough surrounding tone to see how that patch sits on the object. You can begin with the light already available where you are comfortable working.
Notice highlights along a fold

Rogue and X-23/Laura Kinney from X-Men · Photograph: Yenra
Captured: 2010:07:31 14:13:40
In this two-person portrait, narrow white highlights run along the glossy black top on the right. The fabric's folds interrupt and redirect those bright lines. Compare their shapes with the broader dark areas beside them, then follow how the highlights describe the clothing near the shoulder and torso.
The green mesh on the left offers a different visible texture. You can enjoy that contrast without needing to identify the materials from a photograph. Describe what you can see: a repeated open pattern, a broad dark area, or a narrow bright line along a fold.
For your own photograph, try a small change in viewpoint. Watch the bright shape as you move rather than expecting it to stay attached to the same visible spot. Make another picture when you notice an interesting change. Keep the first view so you can compare the two.
Compare the shape of the shine

Ezra Scarlet, Heaven's Wheel Armor, Fairy Tail · Photograph: Yenra
Captured: 2011:07:30 11:35:02
The silver-colored shoulder pieces in this closer portrait show bright areas beside softer gray tones. Their changing width helps describe the rounded forms. Smaller bright details near the headpiece contribute another scale of shine beside the face and red hair.
These three archive photographs show different subjects and conditions. They offer separate examples to study, rather than a controlled comparison of lighting. A finished picture lets us explore visible highlights while leaving the original lighting arrangement and editing choices open.
Look back at your own pair and name one change: the bright patch became narrower, moved toward an edge, or revealed more of a curve. Which view makes the surface more interesting to you? Keep that observation as a starting point for another experiment. A small change you can describe is useful progress.
Look back with curiosity.
- What shape does the shine make?
- How does it help describe a curve or fold?
- What changed when you moved your viewpoint?
Keep exploring
Noticing reflections in a photograph · Noticing texture in a photograph · Noticing light and dark shapes
Browse the complete Otakon 2010 and Otakon 2011 galleries.