Field notes · Look · Try · Compare
Noticing beams of light in a photograph
Follow the shapes and directions that visible beams of light bring into a photograph.

Confident Woman Struts Her Stuff · Photograph: Yenra
Captured: 2018:04:06 19:01:51
Light can become a visible shape within a photograph. A narrow shaft, a spreading fan or a broad cone can give your eye a path to follow. Start by tracing one of those shapes and noticing what surrounds it.
These three stage photographs from Tekko 2018 offer several arrangements to explore. Their beams share the frame with models, dark spaces and areas of glowing haze. You can study those relationships in a photograph you already have, without needing to recreate the stage.
Follow several directions of light
White beams spread from several points around the model. Some descend from the top of the photograph; others angle across the darker background. Their widening shapes sit among the straighter lines of the stage structures.
Choose one beam and follow it from its narrow end toward its wider area. Notice where its edges remain distinct and where they begin to blend into the surrounding light. Then follow another beam that points in a different direction.
The bright fixtures and the beams extending from them offer different shapes to look at. A small bright point may catch your attention first, while the longer fan carries it farther across the picture. Try describing both in a few words.
Now return to the model. Where do the paths of light sit in relation to the face, clothing and outline? There may be several routes through the frame that you enjoy following.
Notice the space beside the model
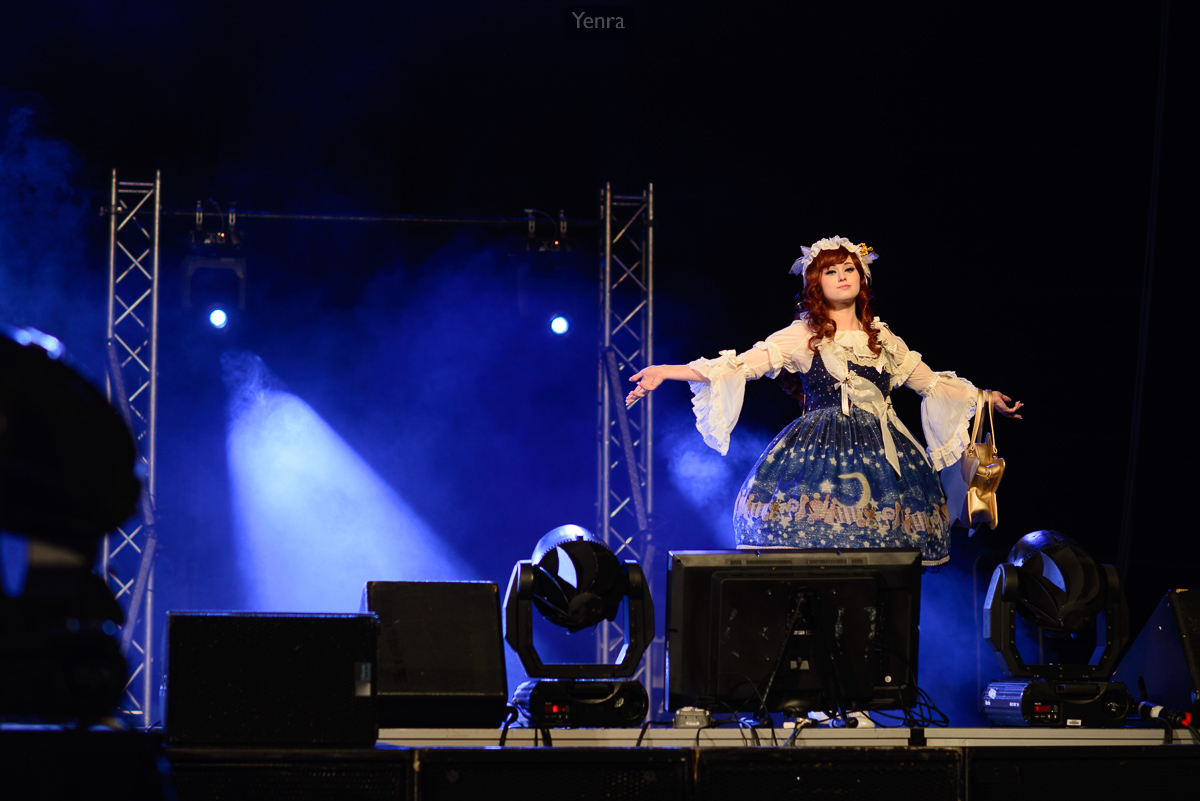
Woman on Stage · Photograph: Yenra
Captured: 2018:04:06 19:32:47
A broad pale blue cone occupies the space to the left of the model in the blue patterned dress. The model's arms extend outward, while the light gives another part of the stage its own visible shape.
Look at the area between the cone and the model. Dark structures and softer blue areas connect the two parts of the photograph. Space beside a person can hold something worth looking at, even when it contains no second person or distinct object.
Compare this arrangement with the first photograph. One has several smaller paths of light around the model; the other gives a broad cone a generous place beside the portrait. Neither needs to be a rule for the other. Each is a useful example of how light occupies the frame.
If you are looking through your own pictures, choose two with different amounts of surrounding space. Ask what the light contributes to that space before deciding which arrangement you prefer.
Compare a beam with a broader glow

Vibrant Stage Performance · Photograph: Yenra
Captured: 2018:04:06 18:49:49
Several defined shafts descend from above the model in this vertical photograph. Lower in the frame, a broader blue-white glow spreads behind the extended arms. You can see both clearer boundaries and softer, cloudlike transitions.
Move your attention between one narrow shaft and the larger illuminated area. The shaft has a direction that is easy to follow. The broader glow occupies more space and changes shape along its edges. Both contribute to the setting around the model.
These observations concern the finished photographs. They can suggest things to notice without establishing the original lighting equipment or decisions. Keep the visible evidence and your own ideas beside each other: “I see a widening beam” and “I would like to explore that shape.”
A small observation is enough for a first experiment. Revisit a stage photograph, or notice an existing patch or shaft of light in an everyday place. Describe its direction, its edges and the space around it. Those few words can help you recognize a similar opportunity another day.
Look back with curiosity.
- Where does the beam lead your eye?
- What changes between a defined cone and a broader glow?
- How does the surrounding space contribute?
Keep exploring
Noticing light and dark shapes · Noticing soft edges in a photograph
Browse the complete Tekko 2018 gallery.