Field notes · Composition
Reading a wide-angle portrait
Study Blue Fairy at Katsucon 2018: composition, camera settings, and a practical exercise in choosing a viewpoint.
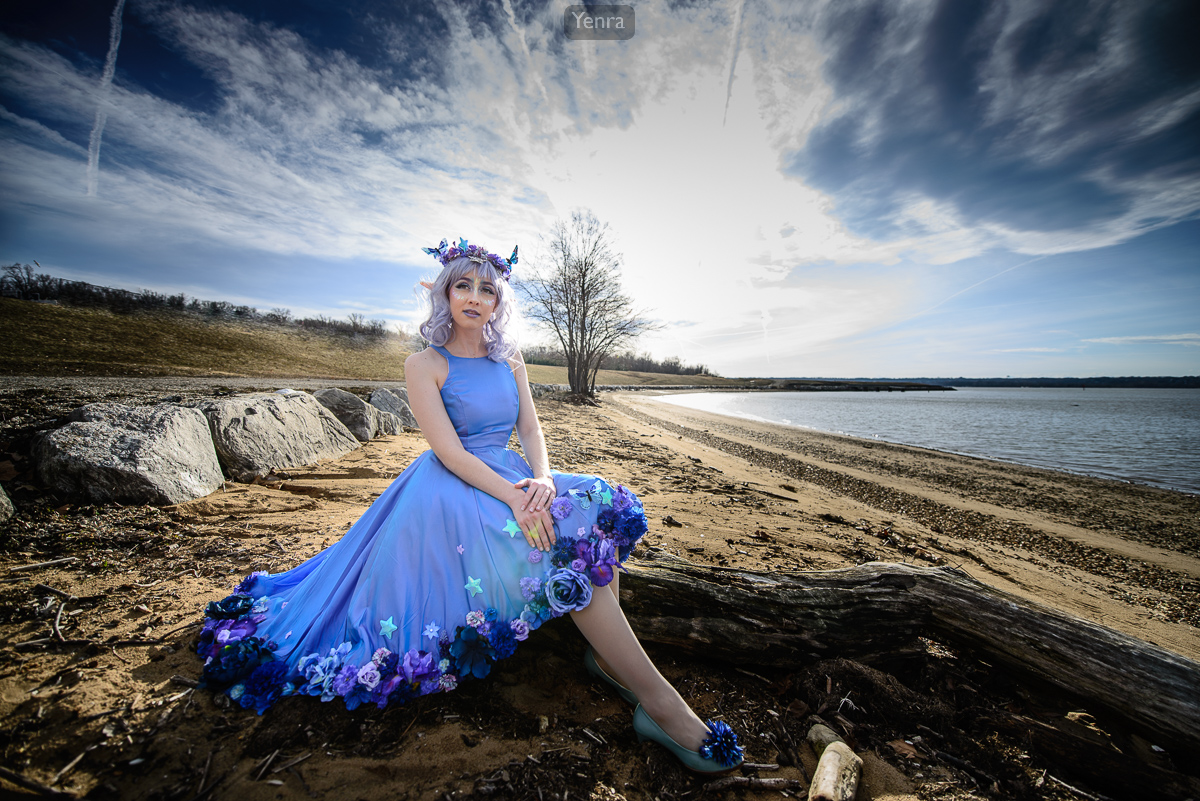
Photograph: Yenra · Credit: SunsetDragon
A portrait can be about a person and a place at the same time. In Blue Fairy, the dress gives the foreground a strong blue shape. The shore draws the eye toward the horizon. Above it, the sky occupies enough space to become part of the picture’s character.
This reading begins with what is visible in the photograph and what is recorded on its photo page. It does not reconstruct the lighting arrangement or the photographer’s intentions from camera settings alone.
Give your eye a route through the frame.
Start with the person. Notice how the blue of the dress stands against the brown shore, and how its spread gives the lower part of the picture weight. Follow the log and the curved edge of the water toward the distance. Then look at the sky: its clouds and brightness create a different kind of space above the subject.
The photograph gives these elements different jobs. The person offers a point of attention; the foreground establishes closeness; the shoreline suggests depth. A useful question when composing your own portrait is: what is each part of the frame contributing? If an edge, a bright patch, or a background object has no useful role, try a small change of camera position before changing equipment.
A wide view starts with a viewpoint.
The photo record gives a focal length of 14 mm on a Nikon D600. A short focal length lets the camera include a broad view. Camera position governs the relative size of near and distant things: moving close makes nearby forms loom larger relative to the background. Changing focal length while keeping the camera in the same place changes the framing; moving the camera changes the perspective.
For a portrait, look particularly carefully at anything close to the lens and near the edges. A small change in distance or angle can change the apparent relationship between a face, a hand, clothing, and the setting. The aim is to choose that relationship deliberately. Nikon’s explanation of focal length is a useful reference for angle of view and framing.
Use the settings as a starting point.
These settings offer a starting point for exploring wide-angle portraits. Try a similar setup in your own light, then adjust exposure, camera position, and framing as you look at the results. Change one thing at a time and compare your photographs—you may discover a balance of person, place, and sky that makes the picture your own.
Aperture affects both exposure and depth of field. The amount that appears acceptably sharp also depends on the photographic situation, including focus distance. Judge the photograph rather than assuming that f/2.8 must produce one particular background. See Nikon’s aperture explanation for the underlying relationship.
Try two positions, then compare.
- Choose a place with depth. A path, shoreline, or repeating background gives you something to relate to the person. Choose a comfortable place to stand and agree on the framing together.
- Make a wider environmental portrait. Include the person and enough setting to show where they are. Check the edges before taking the photograph.
- Change your position. Move a little farther away and, if your camera allows it, use a longer focal length to keep the person approximately the same size in the frame. Ask the person to keep a comfortable, similar pose.
- Compare the relationship, not just the crop. How large does the background now seem beside the person? What happened to foreground objects and the space between them?
- Choose the version that says more. A broad view may make the setting essential. A tighter relationship may concentrate attention differently. Keep the version that serves your picture.
A phone’s main camera is enough to begin noticing viewpoint. Keep track of whether you moved or simply cropped: those are different changes. This exercise is exploratory, not a controlled comparison of lenses.
One question to take with you
Before you press the shutter, ask: “Does the setting help me understand this person or this imagined world?” If it does, give it room. If it does not, change your position and look again.
Continue with the full Katsucon 2018 gallery, follow Cadet Blue through other photographs, or read about working together for a portrait.